Thursday, July 22, 2021

RADIATOR LEAK

RADIATOR LEAK

Our plumber fixing a radiator

A GUIDE TO FIX A LEAKING RADIATOR

Has your radiator water suddenly started leaking? MML Plumbing will give you advice on what can go wrong and what can you do to prevent any future issues.

You might be surprised to learn that cold radiators are a common symptom of just air in the system.

A radiator not heating up properly is often the result of something as simple as air trapped on the top of the radiator or sludge build-up in the bottom. A leak can appear in the radiator thermostatic valves, vent plug or the body if it’s rusty

First things first.

These what can cause leaks in the radiator:

  • Rust pinhole
  • Radiator thermostat valve
  • Radiator spindle
  • Radiator gland nut
  • Pipe joint and seal
  • Radiator valve coupling nut

HOW TO STOP A LEAKING RADIATOR?

radiator repair

It is really depending on many reasons. Where the radiator is leaking from.

Is it leaking from the valve, pipe or body? Different leaks, different methods to stop and fix.

What we always recommend to our customers is to put a bucket under to avoided further damage to your property, and call a professional immediately if you can do the job by yourself.

Don’t forget that in the radiator there is black sludgy water. If this will leak out to your carpet will never come out.

Let us help you with some tips from our experts if you wish to try it yourself:

Make sure before you start to have the right tools, right parts, empty bucket, dry towel ready, Loctite and it is handy if you have a piece of knowledge about plumbing and central heating.

WHY IS MY RADIATOR LEAKING?

Radiators are not complicated and there can be just a few places where can be a leak coming from.

Here are a few common ones:

The most common one is when the lockshield valve starts to drip. If you are lucky and the compression fittings are loosened a bit. All you have to do to tighten up. But sometimes this is not working and you need to replace the whole valve.

Lockshield valve

Another reason for the radiator leak is the bleed valve rubber or pin is damaged. This also can be replaced if you know how to drain the central heating system and fill it up properly without an airlock.

radiator air bleed

If you are not confident with this work, better to call a plumber now before you cause more damage than you. For the plumber, it is easier to diagnose the water leaks first than to fix someone messy job that could take double time.

A leak also can come from the body. If you see that the radiator body starts to leak, there is no other option you need to replace the radiator.

The good news is that if you see any leak coming from the radiator, you can fully close the radiator valve and call a plumber.

IDENTIFY WHERE THE LEAK IS COMING FROM!

How to find the source of your radiator leak?

If you haven’t decided yet to call out a professional, you can try some DIY tips to locate a leak yourself, if it is not obvious.

Make sure your radiator is clean and dry by giving it a rub down with your towel. This will make the leak easier to see, so you know where to start looking for that pesky trickle of water leaking from somewhere in its body.

Now take a small piece of toilet tissue paper and place it on one of three places: the body, the valve, and the pipe which brings water into your radiator.

Make sure you always have an empty bucket ready to keep your house safe from loading water.

Do not touch the leaking area. If there is a leak in the body and you will touch the paint, this can come off and will fold the whole room.

You see it is not complicated to find a radiator leak. You just need a little time and patience.

WHAT TO DO AFTER YOU LOCATED THE LEAK?

If you found the leak and you are planning to fix it here is a few steps that you should do before e you start:

The first thing you should do is turn off the boiler.

All the valves what is coming from the boiler need to be shut. But usually, the central heating flow and return in a combi boiler is the left and right pipes.

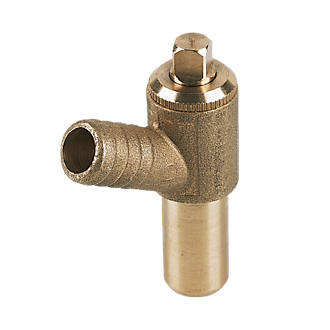
You have to search for the drain cock and drain down the heating system water.

drain cock

Now you are safe to work on the radiators.

If you have a system boiler:

Then you have to go up into the lof, find the F&E tank (the smaller one) and close the water where is the ball valve. This tank feeds the water to your radiators.

PREPARE TO FIX A LEAKY RADIATOR!

Drain the central heating water first. When draining the system, start on the top and open the radiators air vent one by one. The idea behind this step is to let air into the system and push out the water from the rads.

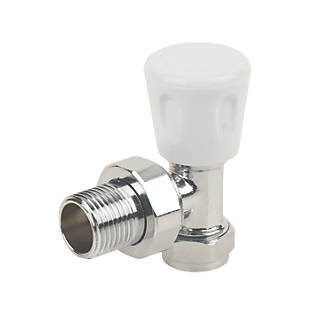
Leaking radiator valve

radiator valve

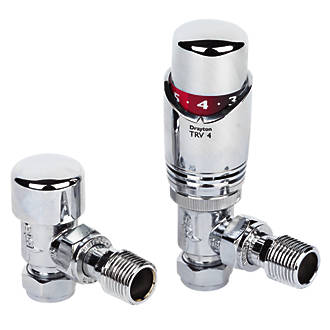
If your radiator valve is leaking, try tightening it before giving up. The internal spindle packing can become damaged and lead to leaks in the valves when they’re open or closed halfway through the motion.

If this is the case, this can often be sorted by tightening the compression nuts. You can also replace the olive inside the valve and also put sealing paste or Loctite around the olive. If you tried everything and none of the options is working you need to replace the whole valve.

To replace the radiator valves, obviously, you drained the heating system. Losen the compression nuts and take out the radiator valve. Also, put a small bucket underneath the valve. Even you drained the system, you still have some black dirty water left in the radiators.

Don’t worry about the old olives what is still on the 15mm pipe. If you don’t have an olive puller you never get this off. Just replace the valve and put some kind of sealant around the top of the olive (PTFE tape, Loctite). Tighten the nuts and you are ready.

Just a saying in the plumbing industry:

If you tighten the nuts and you hear a squeaky noise then the valve will be leaking when you fill the system. It’s a saying but is true. If this happens undo everything and put plumbing sealant paste around the olive. Without any paste entering into the pipes.

Did you manage to get rid of the leak? The most important thing is when replacing a valve is to buy the same one. Not sure? Don’t you worry even for a minute! Call MML Plumbing Ltd on 02083550840 we will supply the parts and we will fix it for you!

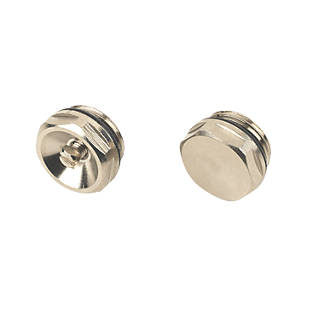
Fix a radiator gland nut

This water leak can be found on top of the radiator head. Just be easy with this DIY fixing, don’t splash all the water to the ceiling.

You can slowly tighten the gland nut. Also, use sealing paste or PTFE tape. This solution is not always working but you can try it. If it doesn’t work, just replace the body of the valve or call a pro who will do the work for you.

Pinhole leaks – rusty radiator body

If you notice a leak coming from the body of your radiator, it is most likely because there has been corrosion or sludge build-up. Pinhole leaks are very small but can lead to a huge leak. Do not touch the leaking rusty area. The paid can come off and the pinhole can get bigger in a matter of seconds.

Here are some tips and checks on how to replace the radiator:

Turn off the boiler and the valves underneath the boiler. Find the draincock and drain the system. Relieve the pressure by opening the bleed point on the top of the radiator. Put some towel underneath the radiator even knowing it’s empty.

Get some help, undo the union nut and quickly take off the radiator from the ball and flip upside down. You can avoid sludge going to your carpet.

After you can install the new brackets and the radiator.


Radiator pipe joint leak

If you notice water dripping from the joints, grab a spanner and tighten the union nut. If this doesn’t work out, follow these steps:

Drain the central heating system water as we mentioned above.

Undo the union nut on the valves.

Undo the radiator valve tail and put sealant on it. This can be PTFE tape, Loctite or sealing paste.

Slowly put back the radiator valve tail and tighten it. Don’t overtighten because the body of the radiator will crack.

Top advice about working on any radiator:

And this is all the leak that can be found around the radiators. It is not complicated and also can be fixed if you know what you are doing. But remember only start the work if you are confident and have the right tools. Everything looks easy but without knowledge and the right tools this job can turn into a disaster and water can go everywhere.

After you have done all the work, don’t forget to close all the radiator air vents, and start to fill the heating system. If you have done everything right you will have heating again and no more leaks.

Frequently Asked Questions

What to do if a radiator is leaking?

We mentioned all the solutions. To fix the radiator leaks sometimes need a professional plumber. But the first step is to turn off both sides of the radiator valve.

Is a leaking radiator valve dangerous?

It is normally a small leak, but if it is leaking badly there is a chance to cause damage, to your property and carpets. So we can say it is not dangerous but only costly to fix the damage after the leak.

Is a leaking radiator an emergency?

If it is leaking badly we treat it as an emergency. Especially in the winter times.

Can a leaking radiator be repaired?

Most of the time, yes! If the body of the radiator starts to leak then this means you need a new radiator. Nothing else you can do about this.

Are radiator leaks expensive to fix?

Not really. It takes around 2 or 4 hours to replace a radiator and 1-2 hours to replace the valve. In both cases, the plumber has to drain the system, remove and fix a new radiator or valves and fill up the system.


DO NEED A PROFESSIONAL PLUMBER?

We also have good news: if everything in this blog post doesn’t work for you and there’s an issue remaining after trying out these methods, our reliable plumber can fix your leak within a few hours!

Maintain and care for your radiators to prevent leaks

The post RADIATOR LEAK appeared first on MML Plumbing Ltd.


from MML Plumbing Ltd https://ift.tt/2Tth0EC
via IFTTT

Water Hammering

Water Hammering

water hammer in the tap

What is a water hammer?

Did you know that a water hammer in the plumbing system can cause banging noises even after the tap being turned off? It is time to investigate before any serious plumbing issues arise.

The banging noise is the pipeline is moving between the joints, touching each other or hitting the wall.

Why do you have a water hammer?

The water hammer is caused by the mains cold water by putting pressure on your plumbing system. In simple therm the high water pressure flowing in your pipeline, and when you close your tap this pressure creating a shock wave and making noises.

If you hear this BANGING noise for the first time, you will not recognise it. Your pipework starts to rattle. But you cant decide if the noise came from the roof, from inside the walls or under the floor. This loud banging noise is called water hammer or other names hydraulic shock.

These are a few sources that can cause water hammer:

  • Air in the system
  • Losen pipework
  • Ball or float valves are faulty
  • Solenoid valves
  • Stopcock
  • Washing machine valves
  • Fit a pressure reducing valve
  • Taps and outlets

Why do you have a water hammer or hydraulic shock?

There are many reasons we have to talk about. Water hammer occurs when the water in your pipes changing direction or something stopping the water flow instantaneously. Normally you hear this BANG when you close your kitchen tap or closing the shower mixer. When you close one of the taps the pipework banging against the wall or hitting each other.

Another time the water hammer could occur is during the night. When no one using the water in your streets, the water pressure increases in your home and rattling. The best thing to start with is to fit a pressure reducing valve before the cold water enters the house.

If you think that this water hammer will suddenly go away in a few days, we have to disappoint you, because it will just get worst. It can cause water leaks and damage to your property.

What can cause a water hammer?

1. Air pockets in the system?

Don’t mix an air pocket with an airlock in the system. An airlock will sully stop the water flowing into your taps.

Air pockets can cause a banging sound. But this is happening straight after you open one of the taps. The air starts to flow with the water and hitting the pipe wall making a noise. To remove the air pocket you have to flush through the system properly and in some cases, the pipe needs to be cut so the air can be released and the system flushed. Installing automatic air vent valves can prevent water hammers. This can be installed at the highest point where the pipework is running.

An example where you can fit the automatic air vent is the hot water cylinder highest point of the water supply pipe that feeds the taps. After you have done any plumbing job, make sure you fill your system slowly to prevent air trapping in the pipes. Also, open the taps to release the air from the system.

2. Washing machine valves

washing machine isolation valve

The washing machine valves can cause a water hammer! How? The valve can close very quickly and stopping the water flow. In simple terms the water hitting the valve inside the wall and making the bang. You can try to turn the valve by half turn and this can release some pressure. This is not the best solution but only for a DIY option. Another option is you increase the washing machine water inlet pipe size. The water will slow down in a bigger size pipe.

3.Fast Closing Solenoid Valves

These valves are operating electrically and closing the water instantaneously. This is a shock to the pipework causing water hammer. An easy DIY solution is to fit a flexible pipe in the pipes that can absorb the pressure change. A proper fix for this job will be an expansion vessel installation.

Are you asking where can you find a solenoid valve on your property? Well, dishwashers and washing machines are operated by a solenoid valve. When the appliance needs a water supply, the board is sending a signal to the valve to let water in or close it immediately.

4. Water hammer arrester

water hammer arrester

Sometimes it works. We can not leave it out from our guide. It works but it is not the best option. We speak from experience when we fitted a water hammer arrestor and didn’t work. It only works if the problem is not so bad. We are rather put an expansion vessel for a long term solution.

5. Pipework is not secured

pipe clips

Old plumbing systems in the UK are not secured, especially under the floorboard. This is one of the biggest factors when you realise you have a water hammer, pipes are hitting each other. To fix this it is an easy job by fixing the pipework with clips to the wall. The hard part is that sometimes you have to cut up the floorboard and climb underneath. Same option if the pipes are banging inside the wall. The wall needs to be cut and pipes need to be fixed.

6. Pressure reducing valve installation

pressure reducing valves

This is the best option to start to fix the problem to reduce water hammer. Fit a pressure reducing valve on the main water supply pipe, before the water reaching the appliances. Don’t forget to also install a stopcock before and after the reducing valve just in case if you have to replace the valve in the future you can do it in 5 minutes. While you doing this installation, you can also fit a limescale reducer.

7. It can be the tap

Old taps where you had to turn the handle two times before the water shut off it is less likely to cause a water hammer. It is because the water can drain from the system and slow down while you turn the tap off. Modern mixer tap turning off quickly and the water hitting the tap body making noises.

8.Your air chambers is blocked

You can see this in the modern water system. You might don’t have this in your system so don’t start to look for it. This air chamber helps to reduce the shock wave in the pipework after you close the tap. When the air chamber starts to fail, the water will replace the air and causing water to hammer. If the air chamber is not blocked, then you can easily shut off the water, drain the system by opening the tap, and the air chamber will fill up with air again.

9.Old stop valves

Your 15-year-old stop valve can also cause this noise. This can happen when the stop valve has loosened washers glands. The water flowing through the valve and rattling the handle.

10.Water tank ball valves

Water wave? Have you heard about this? Your water tank in the loft starts to fill up, the ball valve is starting to closing. But sometimes the ball valve (what is controlling the water pressure) is closing, falling, opening-closing again. If you have only a plastic water tank the water will make waves and pushing up and down the ball valve and cause a water hammer.

If you install a water pressure reducer this will help you maintain the constant pressure in the whole water system. Make sure you install a plastic water tank that is reinforced by a metal frame.

How to fix a water hammer?

  • Make sure all your pipework are fixed properly to the wall and floors.
  • In some places, you have to fit a copper pipe expansion joint, this will prevent water hammer.
pipe expansion joint
  • Install a water hammer arrestor. But our best advice is to always fit a potable water expansion vessel on the pipework. The expansion vessel can deal with higher water pressure and you can avoid banging noises.
  • Fit a pressure reducing valve.
  • Use pipe insulation around the pipes which can absorb the water hammer and pipe expansion. Pipe expansion happens when cold or hot water flowing in the pipes and increasing the pipework by a few centimetres or meters depending on the pipe materials.
  • Sometimes just leave the job for the professional plumber
  • Choose a solenoid that is closing slowly.
  • Install a water pressure regulator

You can install a copper air chamber.

The idea behind the air chamber is when the water is suddenly shut, this air chamber will absorb the high pressure.

Install a mechanical water arrestor

The shock arrestor is working similar to the air chamber but the spring reducing the shock wave. This is. more expensive to install but it will help to resolve the issue.

Do-you-need-expert-advice-about-choosing-our-plumbing-gas-and-heating-boiler-installation-services-Request-a-Callback

Frequently Asked Questions About Water Hammer

Q: How do you fix a water hammer in the shower?

  • Avoid air getting to the system.
  • Install a pressure reducer.
  • Change all the faulty cartridges
  • Clip water pipes
  • Use pipe

Q: How do I get rid of the air in my water pipes?

Sometimes it is enough if you open the tap and showers and run it for few minutes. The air should leave from the pipes

Q: What causes water hammer noise?

Usually, a water hammer is caused by the high-pressure incoming main water supply causing a water hammer. This putting pressure on your water system.

Q: Can a toilet fill valve cause a water hammer?

In short yes. If you have a faulty inlet valve with limescale build on it this can not close fully when needs and can cause a water hammer.

Q: Can water hammer damage pipes?

In the short run NO. To stop the water hammer in your plumbing, you must first diagnose where it is coming from and then repair that problem. In the long term, water hammers can damage the joints in the water system, causing them to leak.

Q: How much does it cost to fix the water hammer UK?

You cant get an exact price for this work. The plumber needs to investigate the job first. This can be 1 hour to a few hours. If the nagging noise came from under the floorboard, this needs to be searched first.

Q: Do I need a water hammer arrestor for a shower?

You only need a hammer arrestor if you hear the banging noise that is coming from or around the shower.

Q: How do I stop my house pipes from banging?

The best solution to start with is to install a water pressure reducer and an expansion vessel to the main water supply pipe.

Q: Is the water hammer dangerous?

In a short period, a water hammer is acceptable. But in the long run, it can cause all kinds of cracks on the pipework and leaks.

Q: How to get rid of the water hammer?

If you carried out all the necessary steps and you still can’t find solutions then call a professional plumber who can provide solutions for your problems.


Do you fix you water hammer issues?

If you need to speak with our professional team call MML Plumbing at 02083550840 or you want to book our professional plumber contact us in North London today and we find the solutions for you!

The post Water Hammering appeared first on MML Plumbing Ltd.


from MML Plumbing Ltd https://ift.tt/3iz7F6R
via IFTTT

Saturday, July 10, 2021

Legionella disease: hot & cold water tanks

Legionella disease: hot & cold water tanks

legionella bacteria in the hot water system

Legionella disease is a serious and potentially life-threatening illness. This will be caused by exposure to water contaminated with Legionella bacteria.

We will discuss what you need to know about this dangerous disease!

How it is contracted, the symptoms of infection from legionella, and steps that should be taken to prevent contracting the illness. We will discuss the dangers of legionnaires disease in the plumbing systems.

What is Legionnaires disease?

Legionella bacteria is commonly found in water but can be found at higher levels as a result of warmer, or cooler, temperatures. The bacteria multiply in hot and cold water storage tanks when the temperature is between 20-45°C.

The bacterium will survive in low temperatures and are inactive below 20°C, and will die at 60°C.

The risk of the legionella bacteria

The dangers of legionella disease are very common in the plumbing industry. The disease is a deadly type of pneumonia that contracted by inhaling droplets containing live bacteria. When inhaled, these droplets from the water outlet and air conditioning can cause legionella disease. Common areas are hot and cold water outlets, shower rooms, spas and fitness centres where.

How does it spread

The bacterium can found in the water tank that poses the biggest threat is Legionella bacteria pneumonia.

Water supplies can carry the bacteria, but they won’t multiply in cold temperatures. When the bacterium gets inside the water heater it starts to multiply and it can spread through the plumbing system. While you take a shower you can bread in the bacterium. Bathing is one of the main ways people get infected with Legionnaire’s disease.

That’s why it is so important to maintain the hot water cylinder temperatures over 60°C, where the bacteria will die.

Signs and symptoms of the legionnaires’ disease

In rare cases, patients have a headache, high fever and muscle ache. Some people might also experience chest pains while breathing.

Other symptoms include fever, dry cough, muscle aches, loss of energy, chest pain, chronic respiratory and kidney disease. If Legionnaires disease is caught in time it can be treated.

Prevention Tips and Tricks

Using temperature control is one way to prevent legionella from forming in your hot and cold water systems.

Every household hot water cylinder has a thermostat that controlling the temperatures in the cylinder and set to 60°C.

When you turn on the hot water and only find that it is lukewarm, your cylinder thermostat may have broken. It is time to call our plumber immediately who can investigate the issues.

How do you prevent legionella growth?

cylinder thermostat
  • Monitor the temperatures of your hot water cylinder and store the water over 60°C. The bacterium will survive low temperatures.
  • Keep AC unit filters clean so that bacteria don’t have access to oxygen, which it needs for growth.
  • Ensure there is no stagnant lukewarm water in your home.
  • The cold water should be stored below 20°C.
  • Never leave a dead leg on the pipework. Is called dead leg where the water is not moving through the pipe, and in stagnant water, the bacteria will grow.
  • Check your cylinder at least once a month.
  • Keep your plumbing system clean. Descale your showerheads and hoses. If can book a plumber who can wash out your cold water systems and hot water cylinder do it.
  • You cant take a shower at 60°C, but the thermostatic mixer valves in the bathroom mixing the water to a desirable temperature.

Prevent hot and cold water stagnation and dead leg

dead leg in the plumbing system pipework

When the water isn’t flowing well, it becomes stagnant and creates an environment where the bacterium will grow.

Water flow can be challenging to inspect. Knowing where stagnant water may accumulate can save your building from the spread of the bacterium.

How can you prevent bacterial growth in hot and cold water systems?

1.Your plumber has to design water systems that comply with the WRAS health and safety regulations.

2.Don’t leave any dead leg on the pipework.

3.Keep the pipework short.

4.Hot and cold water cylinders need to meet the regulations.

5.Insulate your pipework and storage water tanks and don’t forget to put on the cold water tank cover.

Other methods can be used for preventing the disease

Check your hot and cold water systems regularly that you have the appropriate temperatures. Book a plumber who can carry out a risk assessment, take water samples and analyse the bacterial growth.

In a bigger water system, you can also use silver, copper ionisation and biocide/chemical treatments. The chlorine dioxide will kill the bacterium. Every month, legionella control monitoring should be carried out. The microbiological count in water should be less than 103-104.

Do-you-need-expert-advice-about-choosing-our-plumbing-gas-and-heating-boiler-installation-services-Request-a-Callback

Frequently Asked Questions About Legionella bacteria

Q: Can Legionella grow in pipes?

Yes especially in dead legs where the water not moving. Minimise the unused pipework, keep your plumbing water system clean, and descale the showerheads.

Q: Where is Legionnaires infection most common?

The bacterium can be found everywhere in the world. The bacterium can be found in the most common areas, such as rivers, lakes, and pools.

Q: How does Legionella get into the water supply?

The bacterium can be found in the water supply but under 20°C they won’t grow. If reaches the storage cylinder it starts to grow if the water is not heated above 60degrees Celsius

Q: What is the most common way of contracting Legionnaires disease?

Usually, people get infected by inhaling the bacterium from water droplets while they take showers.

Q: Can Legionella survive in chlorinated water?

Yes. The bacterium is resistant to water treatments and will die at high temperatures.

Q: Can you get Legionnaires disease from tap water?

Yes, you can if the water is not kept above 60 degrees Celsius in the cylinder. You can breed in the bacterium droplets while you using the tap.

Q: Can you get Legionnaires infection from a shower?

The showerhead is the best place where the bacterium can be found. The bacterium will be dispersed in water droplets.

Q: How long does Legionella take to develop in water?

If the hot water is kept between 20-45°C in the storage tank, the bacterium can grow in 2-10 days.

Q: How often should showerheads be cleaned and disinfected?

Showerheads need to be disinfected every three months to prevent bacterium growth.

Q: Can you get legionella from cold water?

Yes, you can get infected. The bacterium can also be found in cold water systems. But they only grow if the temperature is between 20 – 45 °C. Under 20°C the bacterium go into hibernation.

Q: What happens if you drink water with Legionella?

If the water is infected and you cough or choke while you drinking and the water gets to your lungs, you can get infected.

Q: How do you get rid of bacterial Legionella?

If you return from holiday make sure to reheat your hot water cylinder above 60C before starting to use it. The bacterium will die at this high temperature.

Q: Can you do your own Legionella risk assessment?

You can perform the test yourself if you purchase a kit. But only expert plumbers know how to control legionella bacteria in your plumbing and water systems.


Do you need a plumber for your immersion heater replacement?

The post Legionella disease: hot & cold water tanks appeared first on MML Plumbing Ltd.


from MML Plumbing Ltd https://ift.tt/3xzOH66
via IFTTT

Testing an immersion heater

Testing an immersion heater

immersion heater

This testing can be carried out by a more knowledgeable homeowner and advanced DIYers.

In this article, we advise customers who have the right tools and they are more confident in testing the immersion heaters with a multimeter. You can buy a multimeter on amazon or at the local merchants. This work involves electric testing.

Read on and we show you:

  • What are the steps to check a heating element?
  • What readings you should have.
  • And what should you do if you find a fault?

An immersion heater typically consists of three key components: a heating element, a thermostat and an automatic cut-off device.

To diagnose a faulty immersion heater you have to carry out three testings:

Testing between the heating element terminals where you should read on the multimeter screen 20 ohms.

Testing between the two terminals on the immersion heaters thermostat (stat). Your reading has to be below 1 ohm when the water is cold.

Between the heating element and the casing you should have an open circuit (OL)

How the immersion heaters are used

Normally the cold water will enter the cylinder at the bottom. The hot water goes out to the top of your taps. The cold water will be supplied to a storage tank that is in the loft or will be fed directly from the mains.

It is very common to have two immersion heaters one at the bottom and one at the top.

The bottom immersion heater will be heated up at night at a cheap rate of electricity which heats the entire cylinder.

The top immersion heater will be used in the daytime, which will heat only the top part of the cylinder.

If your immersion heater is located right on the top of the cylinder, this will be a long one that will go down almost at the bottom.

Heating element

heating element

The immersion heater alloy coil is called a heating element this will be inside the cylinder.

Inside the heating element (which is made from alloy which is used in hard water areas), there is a coil of wire which heats up. The tube in the middle of the immersion heater is the thermostat which is controlling the temperature.

Before you start the work

electrical fuse box

Make sure you turn off the switch in the fuse box.

The immersion heater cover slides onto the threaded rod which holding the top cover in place, but it is also the earth connection. A green/yellow wiring will be attached to the bottom.

Wiring

There is also the Neutral connection. This neutral connection is going into one side of the heating element, the ~230 volts will be returning at this point.

The other side of the heating element is connected to the point marked with “T”. From here a small wire connected to the thermostat.

The incoming ~230-240 Volt goes to the left side of the thermostats, where the temperature will be controlled. From the thermostats, the other wire will be connected to the immersion heater heating element.

The thermostat is just a switch. When heat requires the two-terminal is linked together inside the thermostat. When the temperature will reach the desired settings the switch inside the thermostat will open and disconnect the terminals, the thermostat will turn off.

In the middle of the thermostat, you can find the temperature control button where you can set the temperature to at least 60° C. If any reason the temperature control will fail, the thermostats will be on continuously and overheats. Meaning ~230 volts will go through this two-terminal even when the thermostat is off.

To prevent the water from overheating up to 90° C (where the water will start to boil) the reset pin will pop out and disconnect the terminals in the thermostats. This means that the main immersion heater thermostat failed and you have to replace it.

If you can’t see the reset pin on the thermostat then it will be a separate one. Normally you will find the overheated device next to the thermostat. Then the power will be connected first to the overheat device and after to the heating element.

In simple English:

~230 volts will flow through the thermostat first, where the temperature will be set to 60° C at least. The power will flow through the overheat cut off-device and after connects to the heating element from the thermostat. The ~230 volts will go around the wire inside the heating element, heating your water and returns to the neutral connection.

How do you test the immersion heater element?

You need a multimeter and have to use it on OHM settings.

Check the multimeter proper function by connecting the lead. You have to see 0 (zero) or 00.1. This means the multimeter is working.

Testing the heating element

The heating element itself should have a really low resistance between the N (neutral) and the other side which is the “T”.

You have to check the wire in the heating element if it’s still in good condition. Meaning the wire inside is not broken.

Attach the red and black multimeter lead to the heating element. Remember you are still using OHM settings.

On a 3KW immersion heaters, the reading should be around 20 ohms. But anything between the 15-25 ohm is normal, meaning everything working properly.

If the reading is 1 or OL (open circuit), it means the wire inside the element is burned through. 

If your readings are very high, the water probably gets inside your immersion heaters.

How to fix it:

You have to drain the water from the cylinder by opening the tap and draincock. After you need a special cylinder remover tool and take out the cylinder by turning it anticlockwise. If the cylinder is old it can crack and you have to fit a new cylinder.

If you struggling to do the work yourself, call our professional plumber who can do the work.

Testing the immersion heater thermostat

immersion heater thermostat

Remember that this is only a switch. The multimeter settings remain on ohm resistance. So you testing if the terminals are connecting or not together when you turn up the switch.

The thermostat (stat) will be a closed connection when ~230 volts flowing through on it, and an open connection when there are no ~230 volts going through between the two terminals.

Connect the leads to both sides of the stat. Doesn’t matter which leads connect where.

If your thermostats are turned to 60° C, there are ~230 volts flowing through the terminals.

The measurement you have to get on the multimeter display is 0 or 00.2.

If you turn the stat to a lower temperature, first you have to hear a click.

If the thermostat is of the reading on your multimeter should be 1 or OL (infinite resistance, open line).

If the thermostat is on 60° C and your readings are 1 or OL it means it failed.

How to fix:

Remove the wiring from the thermostat, buy a new one and replace it. The thermostats will slide out from the immersion heaters body.

Testing between the heating element and the immersion heater body

You still on ohm resistance settings on the multimeter.

Your readings should be 1 or OL. You should have high resistance, an open (OL) reading. This reading is totally fine.

The only problem you could have in this testing is that the multimeter applies only a small voltage (1.5-3volt). For a proper reading, you need an insulation tester that applies 500 volts which is expensive.

But if you find that you have done all the testing and the switch is still tripping in the fuse box, then there is a fault between the heating element and earth connection.

If you have done all the testing and everything was fine and your immersion heater is still not working the flat is elsewhere. You have to check the fuse the controls or wiring.

How to fix your faulty immersion heaters:

Change the immersion heater.

Do-you-need-expert-advice-about-choosing-our-plumbing-gas-and-heating-boiler-installation-services-Request-a-Callback

Frequently asked questions

Q: How do you test an immersion heater with a multimeter?

You need to buy a multimeter that you can pick up in the local plumbing merchants or from amazon.

Q: What is the required resistance of an immersion heater?

Anywhere between 15-20 ohms are good. OL or 1 means the immersion heater is faulty.

Q: How long should I have my immersion heater on?

For a 100-150 litre water tank, the immersion heater needs to be on from 1.5 to 3 hours. This is how long it takes for the immersion heater to heat your water.

Q: What happens if you leave the immersion heater on?

Nothing dangerous. The immersion heater will be on constantly, but the stat controlling the immersion heater. So if the desired temperature is reached the stat will switch off the immersion heater.

Q: Is it cheaper to leave the immersion on all the time?

No. To run an immersion heater is quite costly. If you are on holiday turn it off. If you also have a gas boiler that can be used instead to heat the water use the boiler. You can see on your meter how fast is spinning when you turn on your immersion heaters.

Q: Why do I have 2 immersion heaters?

The bottom one is used at night when the electricity is cheaper, the top one is used in the daytime when you need hot water.

Q: Is it cheaper to use a boiler or immersion heater?

Yes. Gas will be always cheaper than electricity.

Q: What is the ideal temperature for an immersion heater?

You need a minimum of 60C to kill any legionella that can grow in the cylinder.

Q: Do all hot water tanks have immersion heaters?

Most of them have an immersion heater in the UK, but this is used as a backup if your boiler breaks down.


Do you need a plumber for your immersion heater replacement?

If you feel that this is a quite big job for you, contact us today and we can book you an experienced plumber or gas engineer.

The post Testing an immersion heater appeared first on MML Plumbing Ltd.


from MML Plumbing Ltd https://ift.tt/3hwG3Qp
via IFTTT

Immersion Heater Is Not Working

Immersion Heater Is Not Working

immersion heater

You are feeling excited and well deserved after a day of hard work. It can be frustrating when the hot water tap only lets out a small amount of warm water! If you have to wait a long time to get hot water, you have some issues in the system.

You are wondering why my immersion heater is not working? The likely causes of immersion heater issues may be anything from a limescale buildup to a faulty thermostat.

Is your hot water not reaching the temperature you expect it to? Then read on for insight into what could be causing this issue. We will give you few tips on what can you look out for.

Why I have cylinder immersion heaters

The old water heater that used a gas burner to warm the water was replaced with a storage tank and immersion heater.

First, you should have a hot water cylinder in the airing cupboard or the loft. Inside the storage tank, you can find the cylinder immersion heaters. You can have two immersion heaters, one at the top and one at the bottom. The immersion heater is heating your water inside the steel tank providing you with hot water. The immersion heater replaces the gas water heaters, which is not manufactured anymore.

The upper heating element is just for a boost. You can turn it on and you will receive hot water in less than 10 minutes.

How does my heating element works?

heating element

The immersion heaters are heating the cylinder directly. In simple terms, this means that the element is slid inside the water tank.

The heating element is a small metal coil that is inside the cylinder. An electric current will pass through this thin wire. And the element will heat the water.

Your kettle in the kitchen is working the same as an immersion heater in the cylinder. The water heater is working the same too.

The immersion heater is connected with the main electrical supply through an isolating switch that you can find next to the cylinder. You can turn on and of the cylinder with a switch. The electricity flowing through this wire, which will be heating the heating element which heats the hot water.

Also, you can find external and internal safety device, this can be a thermostat what regulates the water temperature.

How do I get hot water?

When you start to use your hot water, you open the tap and the hot water start to flow out. Meantime the cold water (what should be high pressure) will enter the cylinder. This will push out the hot water from the tank, thus you have good pressure at the taps.

When you using a lot of water the temperature in the cylinder drops. The thermostat will sense the drop and turn on the immersion heater heating your water.

The process between the hot and cold water mixing in the cylinder are the following:

When the hot water heats up, it will start to rise to the top of your cylinder, leaving the cold water at the bottom. This heated water then will flow out to your taps.

Make sure your cylinder temperature is set to at least 55°C so you can avoid legionella bacteria.

Read more about how can you avoid the dangerous legionella bacteria in your storage tank.

My immersion heater stopped working

The reason behind this can be a few things. Limescale build-up can be an issue. Or the constant use of the immersion heater. If you have also a gas boiler that heats your cylinder, try to use that instead. The immersion heater consumes a lot of electricity.

The average immersion heater will last up to 6000 hours. Manufacturers will give a 5-year warranty. But most of the storage tanks in the UK are over 20 years old.

Why is my immersion heater not working?

The most Common Immersion Heater Faults

In the next few minutes, we explain the most common problems that can cause the immersion heater to fail. But remember not to carry out any work if you are not competent or not confident. We will explain how to investigate the source of your problem starting with the basic immersion heater faults.

1.Check if your circuit breaker tripped

circuit breaker

For the immersion heater to work, it needs electrical power. If there is no power going to the heating element there will be no hot water supply. The immersion heater electrical panel breaker could be tripped.

This is to protect your circuit from overloading. If your circuit overloads this can cause a fire.

All you have to do is to go to the electrical panel and check if the breaker is tripped and turn back on. If you are lucky it could work again. But if not then you have an issue with the heating element.

If you an advanced DIY homeowner, you can test if the immersion heater has a 220-240 volt supply.

If you start to work on any electrical device, the first turn of all the circuit breakers, remove the immersion heater plastic top and don’t touch any wiring. After you remove the lid, turn back on the power and check if there is 240 Volt.

Stay safe, stay alive. Do not rush.

Get more advice from our experienced plumber and check out our services!

Read more about how can an immersion heater be tested with a voltmeter.

2.Faulty thermostat

immersion heater thermostat

If you start to investigate the fault, turn off the power first. On some system, there should be a red reset button on the thermostat what you can press. This will restart your immersion heater and everything will be back to normal.

If you have an older system the steps are the following:

Switch off the circuit breaker in your electrical panel.

On the immersion heater, there is a plastic cover which you have to remove.

Do not touch any wire with your bare hand!

On the thermostat, you can press the simple reset button. This could be a small round red button.

Put back the plastic cover and check the system by turning on the power.

If it’s still not working, you can change the thermostat yourself after you checked there is no power going into it with a voltmeter. But if you are not confident to do so book one of our professional plumbers who can investigate the fault.

3.Your heating elements is damaged

You can’t investigate your fault yourself but just think about the past week’s cylinder performance.

Does the storage water tank take a while or quick to heat up? Usually, a 150Liter cylinder would take between 1-3 hours.

What is happening here, is that the element inside the cylinder corroded. It will still survive a few weeks but when a hole appears on the element, the water will leak inside. In a case like this, the element will turn trip the circuit breaker.

We do not encourage you to change any faulty elements. Only a professional plumber or brave electrician can do this work.

This is serious plumbing work involving closing the water that supplies the tank. Draining down the cylinder and taking out the immersion heater with special tools. Also, if an airlock will build up in the pipes, the plumber can deal with that and know how to resolve the upcoming situation.

Even for a professional plumber is hard work, because sometimes the immersion heater is not moving.

Also, it can happen while the plumber taking out the immersion heater the cylinder can crack and this needs replacing. This is a rare occasion, but if the cylinder is over 30 years old it could happen.

4.Limescale inside your cylinder

This could happen in hard water areas. And we can say that part of North London is falling into this category.

If limescale builds up in your water tank, this can damage the heating element and also you can have less water in the tank.

Again, only a professional plumber can clean out a cylinder. For this work, the cylinder needs to be washed with a high-pressure jet.

The best way to avoid limescale buildup is to call a plumber who can install a limescale reducer. This reducer will be installed onto the cold water pipe before the cold water enters the cylinder.

Cylinder Insulation

hot water cylinder insulation

The insulation is not a fault, but it can reduce heat loss. But if the insulation starts to come off from the water heater then the cylinder will takes double the time to heat up. And even after the cylinder heats up, will lose a lot of heat because of a lack of insulation.

Do-you-need-expert-advice-about-choosing-our-plumbing-gas-and-heating-boiler-installation-services-Request-a-Callback

Frequently asked questions about immersion heater faults

Q. How much does it cost to replace a cylinder immersion heater?

To replace an immersion heater would take around 2-4 hours for the plumber depends on the circumstances. If there will be no complications it will be quick work.

What we mean by plumbing complication:

  • An airlock will be trapped in the pipes.
  • The immersion heater cylinder thread can crack. In this case, the cylinder needs replacing.
  • There will be no draincock in the system to drain the cylinder and the plumber needs to improvise.

Q. Who can change an immersion heater?

A plumber or gas engineer can replace your immersion heater. The best is to get a gas engineer because they can work on gas boilers too. And most likely your water tank will also be heated with the boiler. Or you have a water heater which you need a gas engineer.

Q. What are the different types of immersion heaters?

The copper cylinder has two common sizes which are 11 inches and 27 inches.

There are many types of the cylinder on the market so we advise you to search or buy the immersion heater specially made for your cylinder.

Q. How do you reset an immersion heater?

You should follow the instruction we give above and press the reset pin!

Q. How do you know if the immersion heater is working?

You can’t test it. But if you leave the immersion heater on for a maximum of 3 hours, you should have hot water by then.

Q. How long should the immersion heater last?

It should last at least 5 years or 6000 hours.

Q. Why is the water heater warm and not hot?

Check the temperature settings first. Make sure it is set to at least 55°C.


Do you have hot water by now?

We hope by now, you know the basics of how to investigate some of the immersion heater faults. If you still don’t have any success contact us today for advice! Our expert plumber will help you sort out your problems.

The post Immersion Heater Is Not Working appeared first on MML Plumbing Ltd.


from MML Plumbing Ltd https://ift.tt/3yODTBz
via IFTTT

My toilet won’t flush

My toilet won’t flush

this new toilet it wont flush

When your toilet won’t flush, it can be very frustrating. There are many reasons why this might happen, and we will describe some of these common reason. The first step is to identify whether the plumbing problem is with your drainage system. Is there any obstruction in the tank or if there are water supply issues that can cause the tank parts to fail? If you follow our simple steps you can identify the issue. We help you decide if you can fix a toilet yourself or you need an expert plumber.

There are a few common reasons why your toilet won’t flush

It most likely that one of these parts are broken:

  1. You don’t have water in the toilet bowl.
  2. The faulty or damaged rubber flapper.
  3. The syphon is not working due to limescale buildup.
  4. The fill valve is faulty.
  5. You have a blockage.

A toilet that won’t flush often have a low water level in the tank

toilet cystern

When there isn’t enough water in the tank, it can lead to a situation where the toilet won’t flush. To examine the problem, it is best to look in the back of your toilet tank. In many cases, the water should be about an inch below your overflow tube.

There are many types of cisterns and some of them build inside the wall.

If you can remove the tank lid, check if there is any water flowing in the cistern after you flush the toilet. You might have a running toilet where the flushing mechanism needs replacing.

There are two reasons why you don’t have water in the cistern:

1.If you found that the toilet tank not filling up, you can adjust the float ball inside of it. Sometimes the tank adjuster looks like a screw, you have to twist it left and right to adjust the water level.

2.Check if your main supply is not turned off. In some places, this could be a reason.

Do you have water in another part of the house?

If you checked everywhere and you have water coming out from your taps then the issue lies inside the toilet bowl. You can check if you have an isolation valve underneath the toilets. This can be closed or can be clogged up.

If you are a DIY homeowner, you can turn off the main water. Get an adjustable spanner, undo the nuts, open the isolation valve just a tiny bit! Check if there is any water coming out from your pipe.

If there is water in the pipes then it is more likely that the filling mechanism is broken and you have to replace it.

Is the water level too low in the tank?

Flushing your toilet requires a lot of water to produce the correct flow.

By opening the cistern lid you will find the filling mechanism. You have to adjust the screw to the correct position.

On the ball valve, there is a white plastic pin that you have to turn. The plastic pin is always on the filling mechanism where the water enters the tank. This needs adjusting to having more water in the tank.

The toilet won’t flush because the handle is broken

toilet cystern handle

You might found that the tank handle outside it looks fine but your toilet still won’t flush.

This is due to the handle rod (square shank) or nylon arm has broken.

You have to open up your tank lid and check if the rod or the nylon arm is broken. These parts need replacing. You can find some parts in the local shop.

If you are not confident with the work, call our expert plumber and we sort out your issues in no time.

Your toilet flapper is damaged or bent

toilet flapper

The flapper is bent, your toilet is continuously overflowing and you can not stop it.

The most common reason why a toilet doesn’t flush is that the flapper (the white rubber flap at the bottom of your toilet) is doesn’t seal. To fix this problem, you’ll need to replace it with a new one- and they’re inexpensive!

This might sound like an easy job for someone handy in plumbing but if not, don’t worry: all you have to do is:

  • turn off the water supply
  • make sure the water level behind the old flapper is below its lip before removing it from your toilet.
  • replace the flapper.

Usually, it is better to replace the whole flushing mechanism.

You have issues with the lift chain

The only issue can have with the lift chain is there will be too much slack. If the chain is loose it can not lift the flapper high enough. The water can’t flush the toilet properly leaving you with little or no water at all.

Adjust the chain so that it is tight and can not be pulled through.

If you are unable to adjust the toilet lift chain, check if there is an obstruction. Check the pipe or cartridge inside of the tank.

Check any toilet tissue or flapper valve opening arm sticking up too high. Remove any obstructions and the water might flush in the toilet bowl.

You can cut the chain to the right size and adjust it to the correct level.

Your toilets blocked

This would be the first step that you have to do. You lift the toilet and check if you have a toilet blockage!

  • Do you flush food in the toilet?
  • Are you using too much toilet paper?
  • Do you flush baby wipes in the toilet?
  • Does any cotton bud fall in the toilet?

If you have done any of the above your drainage system might be clogged. You can try to clean out the blockage yourself using a toilet auger or a plunger. If the blockage is further away in the drainage system, you need a drainage engineer for the work.

Before you call an engineer to unclog your toilet check the following:

Check your gutter gulley on the street which is close to your property. That could be yours.

Sometimes the whole drainage system is blocked in front of the property. In a case like this, you have to call the maintenance team which could be Thames water. The front of house drainage issues belongs to them. They can unblock your drainage system in front of the property for free.

Do you need one of our professional plumbers to help with your plumbing problem?

Call us today and our helpful team can give you information on what you should do. We will advise you if you need a plumber to come to your property.

Contact our plumbers today at:

020 8355 0840 by email at info@mmailto:info@mmplumbing.commplumbing.com or check out our other plumbing services!

Quick tips on what you should do before you call a professional plumber

  1. The first thing you should do when your toilet doesn’t flush is to check the water level in the tank!
  2. Check for any obstructions in the pipes that may be causing a blockage!
  3. Make sure there’s enough water to fill up the bowl and cover all of its contents before flushing it!
  4. Don’t forget to clean out your cistern periodically as well! It could be clogged which would cause problems!
Do-you-need-expert-advice-about-choosing-our-plumbing-gas-and-heating-boiler-installation-services-Request-a-Callback

Frequently asked questions about non-flushing toilet

Q: How do you fix a toilet that won’t flush?

Do the basic check what we advised above. Check if it’s blocked. Check the water levels in the cistern. Check the flapper in the flushing mechanism. Check the inlet valve.

Q: Why does my toilet fill up but not flush?

The main reason could be the flappers damaged. Also, check the water level if it’s set to the correct. The water level should be set 1 inch below the overflow tube.

Q: How do you drain a cistern that won’t flush?

The only option is to get a sponge and soak up the water. Plumbers are using a pump that creates suction, but probably you don’t have it in hand.

Q: Why is my flush not working?

Your fault can be a faulty toilet lever or syphon.


The post My toilet won’t flush appeared first on MML Plumbing Ltd.


from MML Plumbing Ltd https://ift.tt/3kawqsx
via IFTTT

14-ways-to-save-on-your-water-bills

14 WAYS TO SAVE ON YOUR WATER BILLS

kitchen mixer tap. Don't waste water

Despite the high cost of owning a home, it’s still worth every penny. Sure, you’ll spend some time doing repairs and performing maintenance projects like repainting your house or replacing old appliances but these are things that will help keep your property value up so in turn make any future buyers happy with their purchase!

How to save money on water bills

With the average water bill in the UK set at roughly £385, it’s no surprise that households are looking to cut their costs. In this guide, we show you how to manage your water bills, reduce water consumption and save money.

Top tips to cut your water bill

Water bills? It’s time to take control

Metered water

Switching to a meter can have some advantages: you pay only for the amount of water you actually use, if you then cut the amount you use your bills will go down. This is great because it encourages people to conserve water and save money! If there are more bedrooms than people living in your house, meter rates will work out cheaper. Meters are fitted free by most companies but only 40% of homes in the UK have them installed.

  • Changing the way you pay for the water: Do you have a water meter, or do you pay a fixed price every year? Depending on your household one method might be cheaper than the other one.
  • Pick up some free water-saving ideas: If you’re on a water meter and looking to save water, there are free gadgets available to help you save. Check the SaveWaterSaveMoney for some additional ideas.

We all know that we can switch gas and electricity providers, typically saving £100s/year by doing so. Yet people assume because you cannot switch water companies, there is no way for savings to be possible when it comes to your water bill. However, this assumption couldn’t be further from the truth! Get a metered water meter, so you only pay for what you use. How much you can save? It varies depending on your household’s usage, but we regularly see successes of £100s a year. Use the water meter calculator below to do a full check.

Free water meter calculator

The CCW (Consumer Council for Water) has a free water meter calculator that tells you if you can save with a meter.

If it’s less than what you’re paying now, you could be quids in.

The world is changing, and we need to change with it. The instructions below will help you save water in a variety of ways!

Decrease the volume of water you use

1.Shower rather than bath

The showers are super great! They’re not only more time-efficient, but they save a lot of water too. Rather than taking an hour-long bath that wastes 80 litres of precious H2O, you can have the same refreshing experience in about 10 minutes with just 35 litres.

2.Turn it Off When Taking A Shower

The next time you’re in the shower, save water by turning off the flow when lathering up or conditioning your hair and switching it back on for a quick rinse. This small change will make an impact.

3.Turn it off when you brushing your teeth

You can save up to 12 litres of water per day by turning off the tap after brushing your teeth.

4.Use a dishwasher instead of washing up

Don’t be lazy when it comes to your dishes! Energy-efficient dishwashers are a super way to save water and energy. But if you run the dishwasher while not full, you’ll use more resources than necessary.

5.Gardening

A garden hose uses 10 litres a minute – most plants don’t need water every day. If you don’t want to use a hose, rainwater is always a good option!

And you can do more!

6.Invest in New Faucets / Replace leaky taps

One of the best ways to save water and energy costs is with our selection of eco-friendly, efficient products. These ingenious innovations will not only help conserve one precious natural resource but also give you a little more money in your pocket! This little product makes up to 60% of saving.

Install faucet aerators

Think you’re just wasting water when your tap is running? Well, think again! These new modern faucets are 30% more efficient than standard models and will save money on utility bills while still ensuring the same great performance.

You can save water and money by installing faucet aerators. Installing an aerator on all of your home’s faucets will reduce the amount of water that flows through them, meaning you pay less for utilities each month! Reduce utility bills just by cutting back on how much running tap water to do dishes or brush teeth – it’ll make a big difference in your monthly budget!

7.Investigate Leaks / Repair leaks

It’s amazing how often a leak can go unnoticed. For example, if your toilet is running even just once per day, that would be the equivalent of dumping litres and litres of water down the drain every week! This could add up quickly without you realizing it until it starts to show in your utility bills at home or from work. If the leak is invisible, to easiest way to notice is by checking your water bills.

DIY tips to check if the toilet is leaking. Drop some food colouring into your toilet cistern, and you will clearly see soon the outcome. If there is any leak, call a professional plumber ASAP, because it can waste up to 400 litres of water a day (2.5 – 5 bathtubs/day) and could add up to £300 a year to your water bill if left unfixed. 

The worst of leaking toilets can waste up to 8,000 litres a day (100 bathtubs a day) and could cost an additional £6,000 a year if not fixed! And this is” just” a toilet.

There are also many reasons to fix leaks in the faucet. Not only does it save you money by reducing your water bill, but fixed leaks also protect your home from costly damages that can be hard to repair.

Repair every leak, asap!

8.Collect the Rain / Use Rainwater to water your garden plants

What better way to save water in the garden than by collecting what nature provided? Consider attaching a rain barrel onto your home’s downspout in order to capture roof runoff.

9. Replace your old appliances with water-efficient products

Saving money on utility bills begins at home. For new appliances, look for the Energy Efficiency Label. Also, consider investing in a front-loader that uses substantially less water than the traditional style of the washing machine. ( 35% to 50% less water is used per load than with a top-loading washer.)

10.Sweep more frequently on sidewalks, driveways, and steps instead of flushing them once

Instead of spraying down dirty sidewalks, driveways, and steps, you should consider sweeping away dirt and debris with a broom to save water, more frequently.

11. Avoid Washing Cars at Home

You might have heard that it’s cheaper to wash cars at home rather than using a car wash. While you might part with a few pounds, if you leave the hose running while washing and your water usage is metered; then there’s going be a hefty price tag for this project.

12.Don’t use the toilet as a bin

We’ve probably all been guilty of this at some point, but tissues and face wipes should be disposed of in the trash instead.

Throwing these things into the toilet not only adds to pollution on land or water surfaces if they leak out before being properly treated for recycling purposes, but it also wastes a ton of fresh water every time you flush. And even worse than that: many items like these are non-flushable anyways-meaning sooner rather than later your pipes will get clogged by them regardless!

13.Store cold water in the fridge

Over the course of a year, think about how much water you waste by waiting for the water to turn cold. Wouldn’t it be better if at all times there was some chilled bottled water on your fridge? Get yourself a jug and fill it up from time to time so that when you need one bottle, it’s already sitting in the refrigerator ready to go.

14.Saving freebies

This might not seem economical to water suppliers, but lots of companies offer selfless home products for you. It means they end up making less money from you, but we’re guessing they know that being good to the environment is more important sometimes!

Here are some examples: extensions for your tap which reduce flow; showerheads etc.

Grab your water-saving freebies here.

Summary:

1. Install a water-saving showerhead

2. Replace old toilets with low-flow ones

3. Repair leaky faucets and pipes

4. Turn off the water when you brush your teeth or shave

5. Fix leaks in toilet tanks, sinks, and washing machines to save up to 22 litres of water per day

6. Use a dishwasher instead of washing dishes by hand

7. Replace old leaky pipes with new ones for less wasted water

8. Take shorter showers and turn off the shower when you’re done so it doesn’t keep running

9. Use a full load of laundry detergent instead of using too much

10. Fix leaking faucets or toilets as soon as possible to save on water bills and reduce waste in general

11. Put a bucket under the kitchen sink to catch dripping water from leaks, then use that collected water for house plants or other purposes. ( AND FIX IT)

Contact our expert plumber today for advice and bookings!

Find out more about our plumbing service in North London

Do-you-need-expert-advice-about-choosing-our-plumbing-gas-and-heating-boiler-installation-services-Request-a-Callback


The post 14-ways-to-save-on-your-water-bills appeared first on MML Plumbing Ltd.


from MML Plumbing Ltd https://ift.tt/3hPwpr2
via IFTTT

How do you find a leak you can’t see?

How do you find a leak you can’t see? Below you can find MML Plumbing’s experts’ advice, on how to solve your water leak issues. ...